Monday, 29 September 2014
The 9 Principles of Hand Tool Storage, Part 3
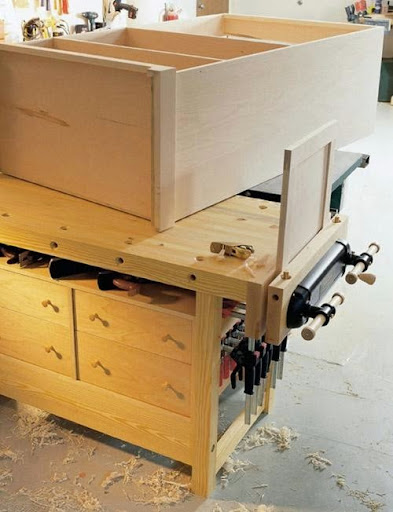
 If you plan your storage correctly, you can maximize limited space. Here I’m using a rolling cabinet as an outfeed table.
My kids – even the 18-year-old in college – do not want their meats to touch their starches or vegetables. And so we have divided plates for them – just like at the school cafeteria.
If they keep this habit up, I’m sure their weddings will be interesting, but I’m not one to mess around with their personal way of organizing their world. So this is my way of saying if you need to have a French-fitted spot for every one of your hand tools, go forth and go nuts.
However, if you are unsure about how to keep your tools organized, consider the pros and cons of French-fitting vs. the peas-mixed-with-turkey-and-taters approach.
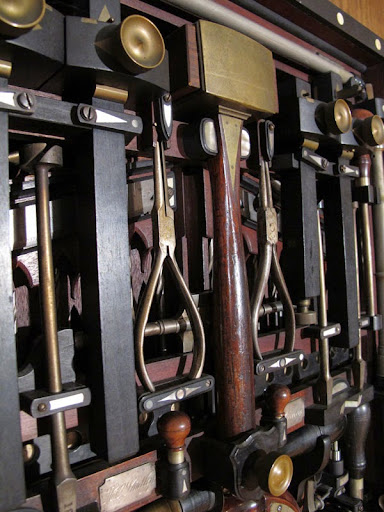
7. French-fitting, pros and cons. If you run a school or shop where people share tools, I recommend some sort of system where every tool has a designated spot, and it is easy to tell whether or not all the tools are accounted for. So the first advantage of French-fitting is that you will always have an excellent accounting of the tools.
The second advantage is that the tools will be protected. Not just the tools’ sharp edges, but also their bodies and handles. No more toolbox dings.
And the third advantage is that your tools will have a fixed location. Your combination square will always be in its velvet-lined womb – not below the auger bits or covered by coping saw blades.
The obvious disadvantage to French-fitting is that it takes up a surprising amount of space. It also requires a good deal of planning, plus a considerable amount of work and material.
All those are personal choices – it’s just time, space and wood.
But for me the primary disadvantage to the fitted approach is that it reduces flexibility. There are times that I want my carving tools easy to snatch. If I’m building a workbench, the drill bits need to migrate to the top of the pile. I don’t change the arrangement of tools on a whim, but things do creep around as my work changes.
It was only when I didn’t have this flexibility that I noticed it. In 1998, after making chisel racks for a tool chest, plus cubbies for my shoulder plane, block plane and drill bits, I bought a 1/16” chisel for installing locks. I didn’t have a place for the chisel, so I stashed it in another drawer until I could figure out how to re-do the rack.
I never re-built the rack. Instead, I piled any new chisel sizes on top of the old ones. It wasn’t ideal, but it did get me accustomed to the idea that edge tools could live in a tool chest while touching one another.
Soon after that, I began to research traditional tool chests, and I found that most of them didn’t have much in the way of French-fit compartments. While they had dedicated spaces for unwieldy tools such as a framing square or handsaws, most had open trays with few dividers and tool racks that weren’t dedicated to holding only one kind of tool.
Edge tools that needed to be protected were stored in the rack or in a tool roll. The other tools (squares, gauges, mallets etc.) could float in the open trays. Yes, they would get the occasional toolbox ding, but I could get a lot more of these tools into a small space. To me, it was worth it.
8. The non-interference principle. When you build your first workbench, one of the primary urges is to fill the space below the benchtop with drawers, doors and what-not. Just like the Shakers did with some (but not all) of their workbenches. I freely admit I did this with a couple of my benches (here’s one). After all, I’ve never heard anyone say: “I have too much storage space.”
But those below-the-benchtop tool chests are frequently in the way of other woodworking chores. Many woodworkers forget to allow some space for the shafts their holdfasts. Or they make it impossible to clamp things to the benchtop with F-style clamps. Or they make it so you can’t have a board jack and hold wide boards on edge for planing. Or if you do have a board jack, it is blocking the drawers you need to get into.
So you get to store a bunch of tools that are frustrating to use.
Another common problem is putting your wall cabinet directly above your workbench. We had some of these cabinets at the first shop I worked in. Inevitably, their doors would be closed and there would be a huge piece of cabinetry on the bench when you needed a tool inside the cabinet.
Other tips: Drawers below a benchtop are almost always a bad idea. You’ll have something clamped down when you need something in the drawer. I’d rather lock the shop than the tool chest if possible – the keys for a chest are easy to lose. Flat-top tool chests attract clamps, project parts and junk.
 Here I’m using my tool chest to brace a workbench as I flatten its top with a jointer plane.
9. BONUS: Storage can serve other shop functions. While you need to keep your woodworking activities and your tool storage from interfering with one another, you also can have them work together at times.
A traditional tool chest can also serve as a sawbench, an assembly table and a nice place to sit while you do some close-up work at the workbench. Small tool chests can be used as stepstools to get to things that are out of reach, or you can put assembled carcases on top of them so you can plane down their joints or surfaces.
I use a rolling tool cart as an outfeed table for my table saw. I have a second rolling cabinet that holds my portable thickness planer. Because I’ve thought these things through (after many years of doing dumb things), they never interfere with my work – they only help it.
— Christopher Schwarz
No comments: